YOLOv9 has arrived! If you were still using previous models for object detection, such as Ultralytics’ YOLOv8, there’s no need to worry. Throughout this text, I will provide all the necessary information for you to get up to date.
Released on February 21, 2024, by researchers Chien-Yao Wang, I-Hau Yeh, and Hong-Yuan Mark Liao through the paper “YOLOv9: Learning What You Want to Learn Using Programmable Gradient Information”, this new model demonstrated superior accuracy compared to previous YOLO models.
In this tutorial, I will present the mechanisms that allowed YOLOv9 to reach the leading model position and teach how you can implement it in Google Colab.
What is YOLOv9?
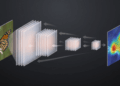
Existing approaches to object detection often emphasize the design of complex network architectures or the elaboration of specialized objective functions. However, they tend to overlook a crucial issue: the significant loss of data information during its transmission through the network layers.
YOLOv9 is an object detection model that introduces the concept of Programmable Gradient Information (PGI) to address the loss of information during data transmission through deep networks.
PGI allows for the complete preservation of input information necessary to calculate the objective function, thereby ensuring reliable gradient information for network weight updates.
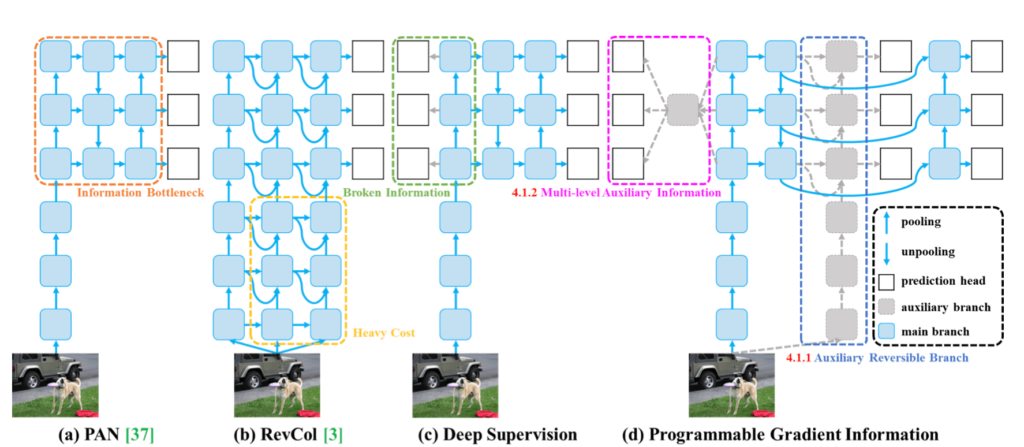
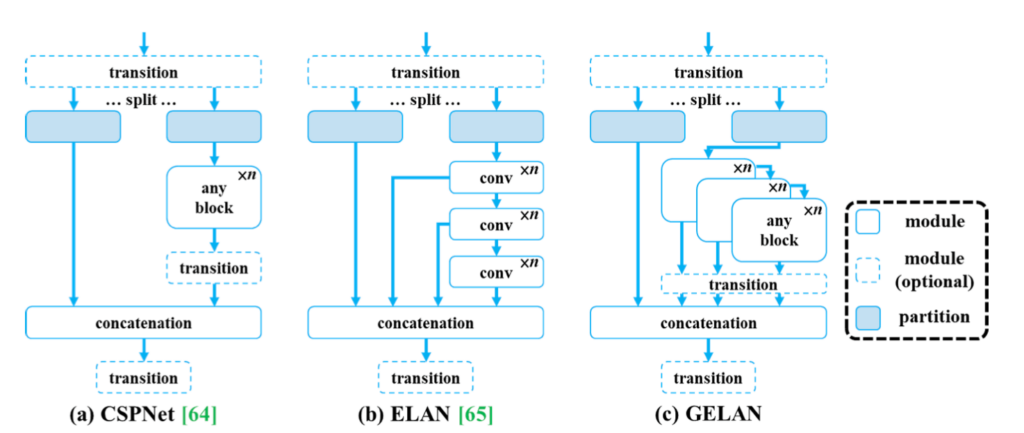
Furthermore, the model presents a new lightweight network architecture, the Generalized Efficient Layer Aggregation Network (GELAN), based on gradient path planning. This architecture was designed to maximize parameter efficiency and surpass existing methods in terms of parameter utilization, even using only conventional convolution operators.
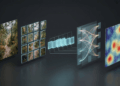
The proposed model and architecture were validated on the MS COCO dataset for object detection, demonstrating the ability to achieve better results than state-of-the-art pre-trained models with large datasets, even for models trained from scratch.
Performance Analysis
YOLOv9 significantly outperforms previous real-time object detection models in terms of efficiency and accuracy. Compared to light and medium models, such as YOLO MS, YOLOv9 has about 10% fewer parameters and 5 to 15% fewer calculations, while improving accuracy (AP) by 0.4 to 0.6%.
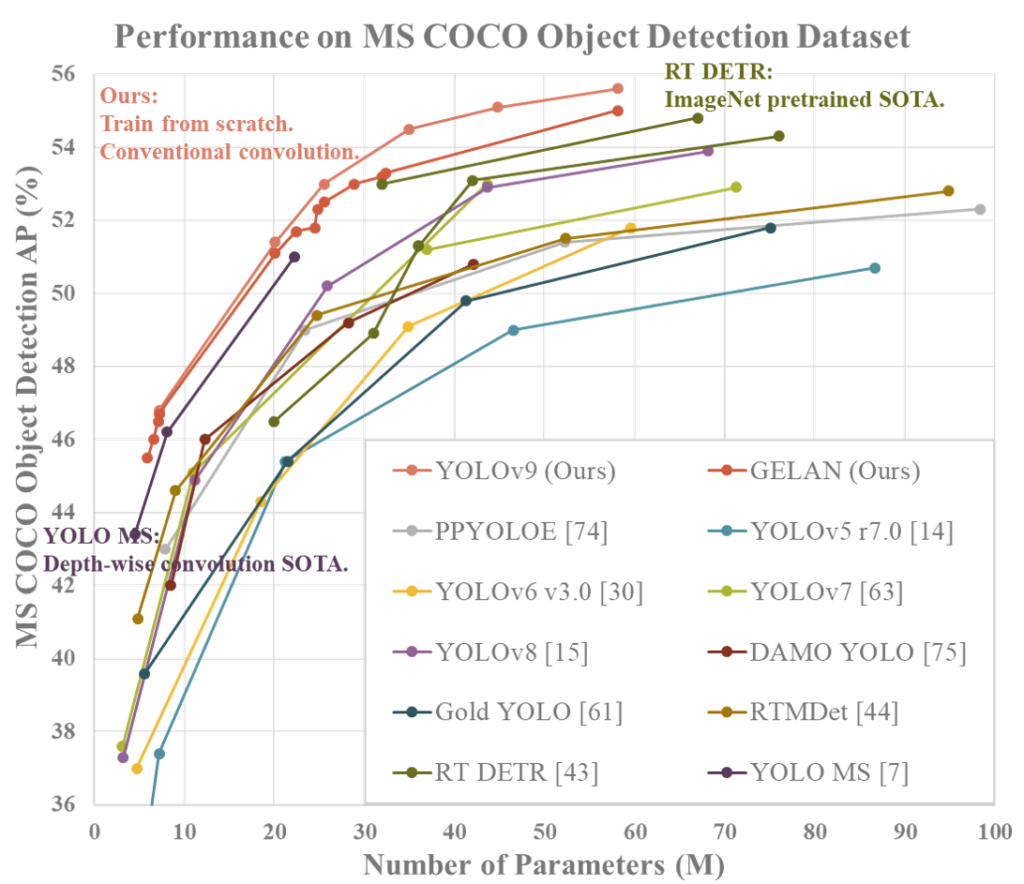
Compared to YOLOv7 AF, YOLOv9-C reduces parameters by 42% and calculations by 21%, maintaining the same 53% accuracy in AP. In relation to YOLOv8-X, YOLOv9-X presents 15% fewer parameters and 25% fewer calculations, with a significant improvement of 1.7% in AP.
These results highlight the improvements of YOLOv9 over existing methods in all aspects, including parameter utilization and computational complexity.
Source Code and License
Moments after the article’s publication on February 21, 2024, the authors also made a YOLOv9 implementation available. There are general instructions on using the model, as well as commands for setting up a Docker environment.
Four weights are mentioned in the README.md: YOLOv9-C, YOLOv9-E, YOLOv9-S, and YOLOv9-M. As of now, the last two were not yet available.
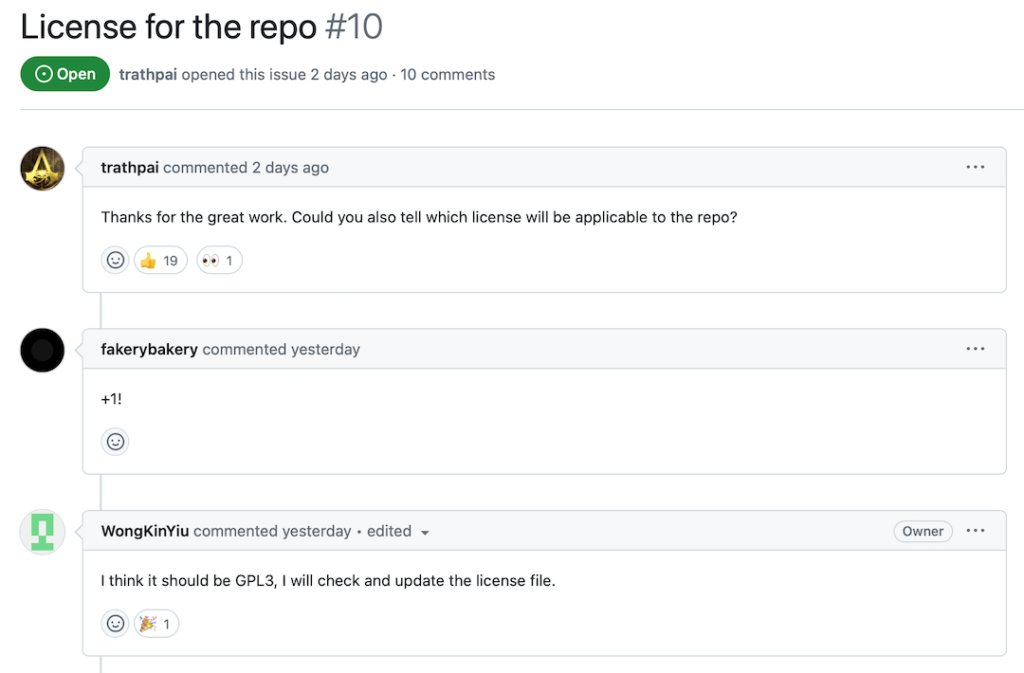
As for the license, no official license has been attributed at this time. However, as you can see in the image below, one of the researchers mentioned the intention to possibly adopt the GPL3 license, a good sign for those intending to use the model commercially.
How to Install YOLOv9
As I mentioned at the beginning of the article, YOLOv9 is a novelty. This means you will not find a package available for installation via pip or conda, for example.
Moreover, as is common with many codes released alongside scientific papers, compatibility issues and bugs can occur. For example, when trying to run the model on Google Colab for the first time, I encountered the error AttributeError: 'list' object has no attribute 'device' in the detect.py file.
For this reason, I made a fork of the repository where the problem was temporarily resolved. I also prepared a Jupyter Notebook for you to open in Colab, which will save you a lot of time. To install this model and start detecting objects in your images and videos, click on the link below:
# Clone the YOLOv9 repository
!git clone https://github.com/carlosfab/yolov9.git

# Change the current working directory to the cloned YOLOv9 repository
%cd yolov9

# Install the necessary YOLOv9 dependencies from the requirements.txt file
!pip install -r requirements.txt -q
This code snippet performs the initial setup to work with the YOLOv9 model in a development environment. First, it clones the YOLOv9 fork from GitHub to the local environment using the git clone command. After cloning, the %cd command is used to change the current working directory to the YOLOv9 directory. Finally, the necessary dependencies listed in the project’s requirements.txt file are installed using the pip install command.
# Import necessary libraries
import sys
import requests
from tqdm.notebook import tqdm
from pathlib import Path
from PIL import Image
from io import BytesIO
import matplotlib.pyplot as plt
from matplotlib.pylab import rcParams
Directory Configuration for Code and Data
CODE_FOLDER = Path(“..”).resolve() # Code directory WEIGHTS_FOLDER = CODE_FOLDER / “weights” # Model weights directory DATA_FOLDER = CODE_FOLDER / “data” # Data directory # Creates directories for weights and data, if they do not exist WEIGHTS_FOLDER.mkdir(exist_ok=True, parents=True) DATA_FOLDER.mkdir(exist_ok=True, parents=True) # Adds the code directory to the Python path for module import sys.path.append(str(CODE_FOLDER)) rcParams[‘figure.figsize’] = 15, 15 %matplotlib inline This snippet initializes the environment for a computer vision project by importing necessary libraries and configuring directories for code, data, and model weights, creating them if they don’t exist.
# URLs of weight files
weight_files = [
    "https://github.com/WongKinYiu/yolov9/releases/download/v0.1/yolov9-c.pt",
    "https://github.com/WongKinYiu/yolov9/releases/download/v0.1/yolov9-e.pt",
    "https://github.com/WongKinYiu/yolov9/releases/download/v0.1/gelan-c.pt",
    "https://github.com/WongKinYiu/yolov9/releases/download/v0.1/gelan-e.pt"
]

# Iterates over the list of URLs to download the weight files
for i, url in enumerate(weight_files, start=1):
    filename = url.split('/')[-1]
    response = requests.get(url, stream=True)
    total_size_in_bytes = int(response.headers.get('content-length', 0))
    block_size = 1024  # 1 Kilobyte
    progress_bar = tqdm(total=total_size_in_bytes, unit='iB', unit_scale=True, desc=f"Downloading file {i}/{len(weight_files)}: {filename}")
    with open(WEIGHTS_FOLDER / filename, 'wb') as file:
        for data in response.iter_content(block_size):
            progress_bar.update(len(data))
            file.write(data)
    progress_bar.close()
This code snippet is responsible for downloading weight files for models from a specified list of URLs in the weight_files variable, saving them in the designated weights directory. It iterates through each URL in the list, extracts the file name, performs the download in 1 Kilobyte blocks to efficiently manage memory use, and monitors the download progress with a visual progress bar.
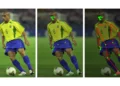
# Test image URL
url = 'https://sigmoidal.ai/wp-content/uploads/2022/11/314928609_1293071608150779_8666358890956473002_n.jpg'

# Makes the request to get the image
response = requests.get(url)

# Defines the file path where the image will be saved within DATA_FOLDER
image_path = DATA_FOLDER / "test_image.jpg"

# Saves the image in the specified directory
with open(image_path, 'wb') as f:
    f.write(response.content)
This code downloads a test image from a specified URL using the requests library to make the HTTP request and retrieve the image content. After getting the response, the image content is saved in a file named test_image.jpg, located in a previously configured data directory.
You can also manually upload your photos, if you wish, by dragging them into the data folder.
!python {CODE_FOLDER}/detect.py --weights {WEIGHTS_FOLDER}/yolov9-e.pt --conf 0.1 --source {DATA_FOLDER}/test_image.jpg --device cpu

# !python {CODE_FOLDER}/detect.py --weights {WEIGHTS_FOLDER}/yolov9-e.pt --conf 0.1 --source {DATA_FOLDER}/test_image.jpg --device 0
Now, just run the detection script, detect.py, located in the code directory CODE_FOLDER, using some of the weights saved in the directory assigned to the WEIGHTS_FOLDER variable. The script is set up to process a test image (test_image.jpg) found in the data directory DATA_FOLDER, with a minimum confidence (--conf) of 0.1 for object detection.
The execution is specifically carried out on the CPU (--device cpu), suitable for environments that do not have GPUs available. Although Colab provides a certain monthly quota, you might not always have a GPU at your disposal. The second line, commented out, shows an alternative command for execution on a specific GPU (--device 0).
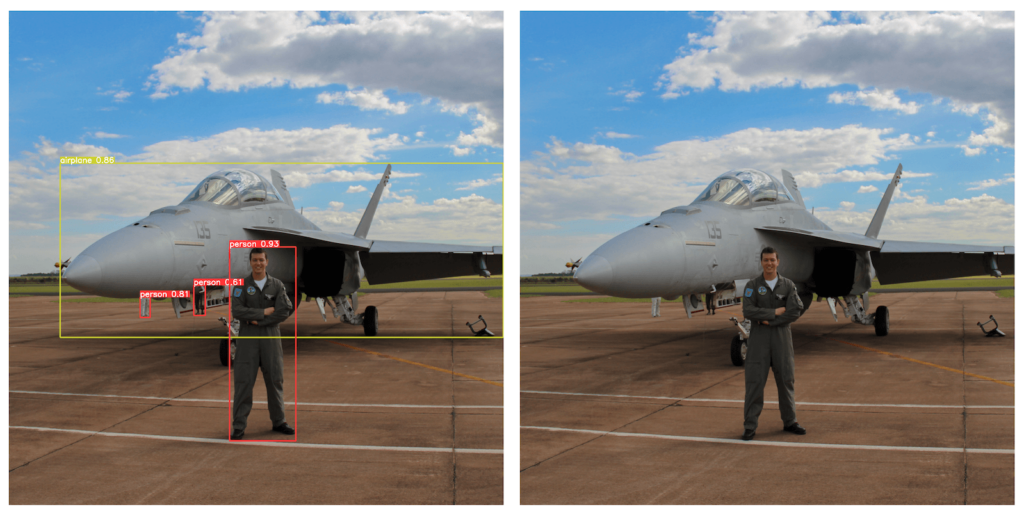
Note that the result of each test will be saved within the folder ../runs/detect/..., similarly to what was done with YOLOv8.
In this tutorial, I showed how you can install the model in the Google Colab environment. However, in this fork I made, I prepared the structure so that you can also use poetry to install dependencies on your local machine.
Summary
- Introduction to YOLOv9: Revealing the arrival of YOLOv9, a significant evolution in object detection that surpasses previous models like Ultralytics’ YOLOv8. This article provides a detailed guide to get updated and implement the new model.
- Innovation through Programmable Gradient Information (PGI): YOLOv9 introduces the concept of PGI, addressing information loss in deep networks and allowing for the complete preservation of input information, which is crucial for the efficient update of network weights.
- Advanced GELAN Architecture: Beyond PGI, YOLOv9 presents the Generalized Efficient Layer Aggregation Network (GELAN), optimizing parameter efficiency and surpassing existing methods in terms of parameter utilization.
- Exceptional Performance: Validated on the MS COCO dataset, YOLOv9 demonstrated superiority in efficiency and accuracy over previous models, offering fewer parameters and calculations while improving accuracy.
- Availability and Access: Immediately after its publication, the authors made the source code and usage instructions available, although some versions of the weights and specific licenses are still pending.
- Installation and Practical Use: Specific instructions for installing and using YOLOv9 on Google Colab are provided, facilitating the practical application of the model for object detection in images and videos.
In this article, I demonstrated how you can quickly test this architecture on your photos and videos. In the coming days, I will bring another publication to teach you how to train YOLOv9 on a custom dataset. Be sure to subscribe and follow me on social media.
Cite the Article
Use the following entry to cite this post in your research:
Melo Júnior, José Carlos de. “YOLOv9: Learn to Detect Objects”. Sigmoidal Blog, 24 Feb. 2024. Available at: https://sigmoidal.ai/yolov9-learn-to-detect-objects