The eyes of the surgical team are glued to the screens, where each movement of the surgical robot is magnified and meticulously analyzed. The scalpel glides smoothly over the patient’s skin, cutting through layers and layers of tissue. The sound is sharp and piercing, echoing through the sterile air of the operating room. The doctors watch the scene closely, their hands sweating coldly as the surgical robot performs its precise movements.
The operating room is a daunting place, illuminated only by the blue light from the monitors reflecting the camera’s image, where life and death walk side by side. After all, even with the best-prepared team, there’s always a possibility of failure. The equipment used in the surgery can have technical issues, and the algorithms usually employed are often unknown.
In this high-pressure environment, one mistake can be fatal. That’s why camera calibration is so crucial.
But have you ever stopped to think about how a lack of calibration can be critical in situations where precision is paramount, like in a robotic surgery or a military operation? Imagine a robotic surgery where a millimeter error could mean the death of the patient. Or consider launching a missile thousands of kilometers away at a military target, with a preschool right next door. Lens distortion and imperfect camera calibration can lead to fatal errors in situations like these.
In the field of computer vision research, camera calibration techniques are of high theoretical and practical value. In this post, you’ll learn the basic concepts of camera calibration and how to use them with OpenCV and Python.
Basics of Camera Calibration
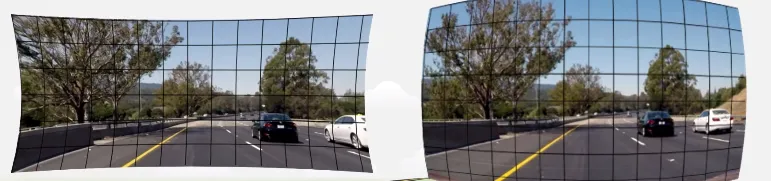
Lens distortion is a common phenomenon in image capture and occurs when a lens cannot accurately reproduce the perspective of a scene in the captured image.
This issue can create shape and perspective distortions in the image, which can be especially problematic in applications involving computer vision and augmented reality. Among the various distortions, the two main ones are radial distortion and tangential distortion.
Radial distortion happens when light rays that pass through the edge of the lens are deflected at different angles than those passing through the lens’s center. This can result in curved or distorted lines at the image’s edges.
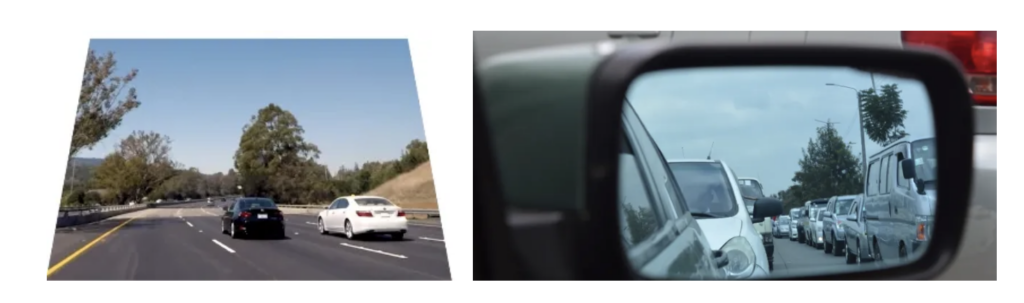
Tangential distortion occurs when the lens isn’t perfectly aligned with the camera’s sensor, leading to straight lines appearing curved or tilted. It’s that feeling that the motorcycle in the rearview mirror seemed farther or even closer than it actually was.
Fortunately, lens distortion can be corrected through camera calibration, which involves measuring lens distortion and correcting the image data based on these measurements. This process is especially crucial in applications demanding high precision, like computer vision in autonomous cars and security monitoring systems.
Why does distortion happen?
It’s important to note that lens distortion isn’t exclusively a problem for low-quality or cheap cameras. Even high-quality lenses can suffer from distortion if not calibrated correctly.
To understand, consider this simple example of a camera model known as a pinhole (pinhole camera model). When a camera focuses on an object, it sees it in a manner similar to our eyes, concentrating the light reflected in the real world. Through a small aperture, the camera concentrates the light reflected from the 3D object onto a plane at the back of the camera.
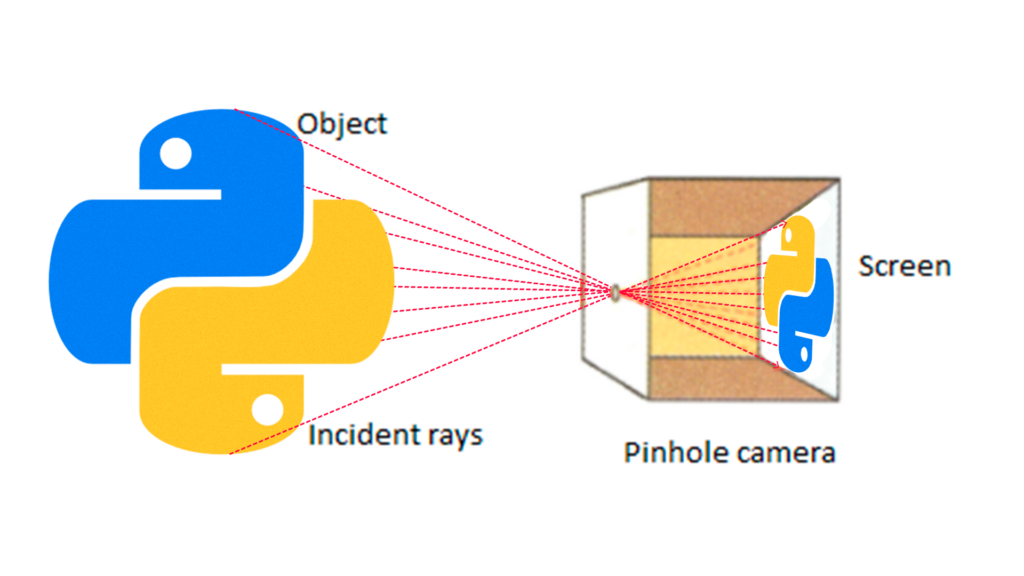
The camera matrix, mapping a 3D scene onto a 2D image plane, is represented by a 3×4 matrix, also called a projection matrix. This matrix is composed of the multiplication of the intrinsic matrix by the extrinsic matrix. The intrinsic matrix, representing the camera’s internal parameters, is given by:
![\[ K=\begin{bmatrix} f_x & 0 & c_x \\ 0 & f_y & c_y \\ 0 & 0 & 1 \\ \end{bmatrix} \]](https://sigmoidal.ai/wp-content/ql-cache/quicklatex.com-9f231e4da59a1d347e6c2da33cc29bf8_l3.png "Rendered by QuickLaTeX.com")
Where  and
and  are the focal lengths in pixels in the x and y directions, respectively.
  and
and  are the coordinates of the main point, or optical center, of the camera in the image in pixels. The last column of the matrix is used to calculate the projection of 3D points on the image, but is not necessary for camera calibration.
The extrinsic matrix, which represents the position and orientation of the camera in 3D space, is given by:
![\[ \begin{bmatrix} u \\ v \\ w \\ \end{bmatrix} = K \cdot [R | t] \cdot \begin{bmatrix} X \\ Y \\ Z \\ 1 \\ \end{bmatrix} \]](https://sigmoidal.ai/wp-content/ql-cache/quicklatex.com-80841cc844404b9aef0194ff7e648a3a_l3.png "Rendered by QuickLaTeX.com")
where u, v, and w are the homogeneous coordinates in the 2D image. To obtain the image coordinates (x, y), just divide u and v by w:
![\[ x = \frac{u}{w},\ y = \frac{v}{w} \]](https://sigmoidal.ai/wp-content/ql-cache/quicklatex.com-844d3718ad064769615736f3dd7b04bd_l3.png "Rendered by QuickLaTeX.com")
Therefore, camera calibration is a crucial step in any computer vision application, which can have a significant impact on the accuracy and reliability of the results obtained.
By recognizing the importance of camera calibration, developers can ensure that their computer vision-based solutions are reliable and effective, regardless of the environment or image capture conditions.
Camera Calibration Implementation with OpenCV and Python
Now that we understand the importance of camera calibration and the basics behind it, let’s discuss the practical implementation using OpenCV and Python. OpenCV is a widely used computer vision library and has built-in functions to perform camera calibration efficiently.
Environment Setup
First, install OpenCV in your Python environment, if you haven’t already. You can install OpenCV using the following command:
pip install opencv-python
Image Collection
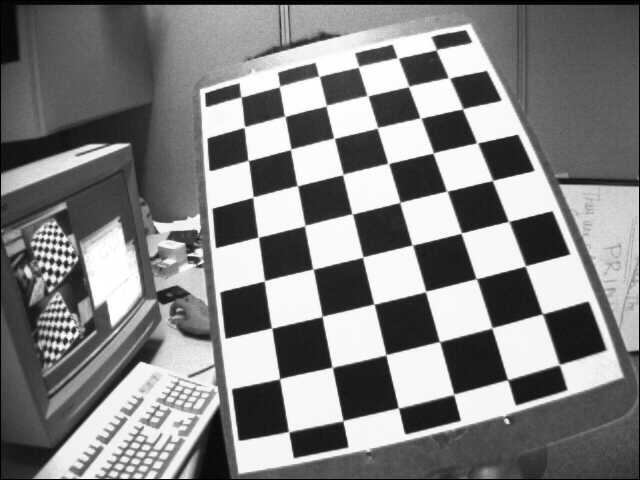
Before we start implementing camera calibration, we need to collect a set of images of a known pattern, like a chessboard. Images should be taken at different angles and positions to ensure accurate calibration. In this example, we will use a set of images of a 7×6 chessboard.
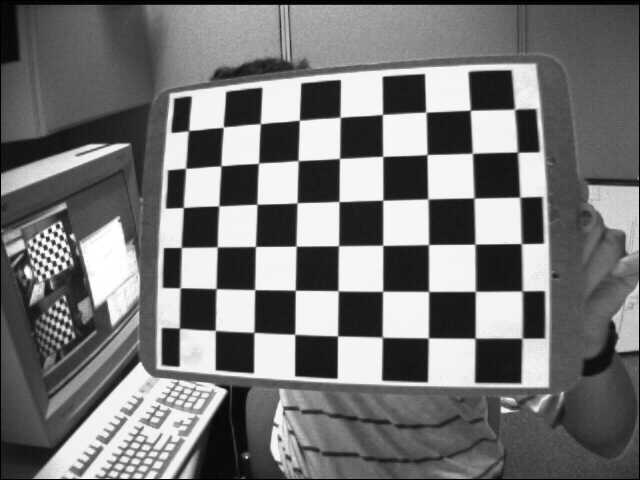
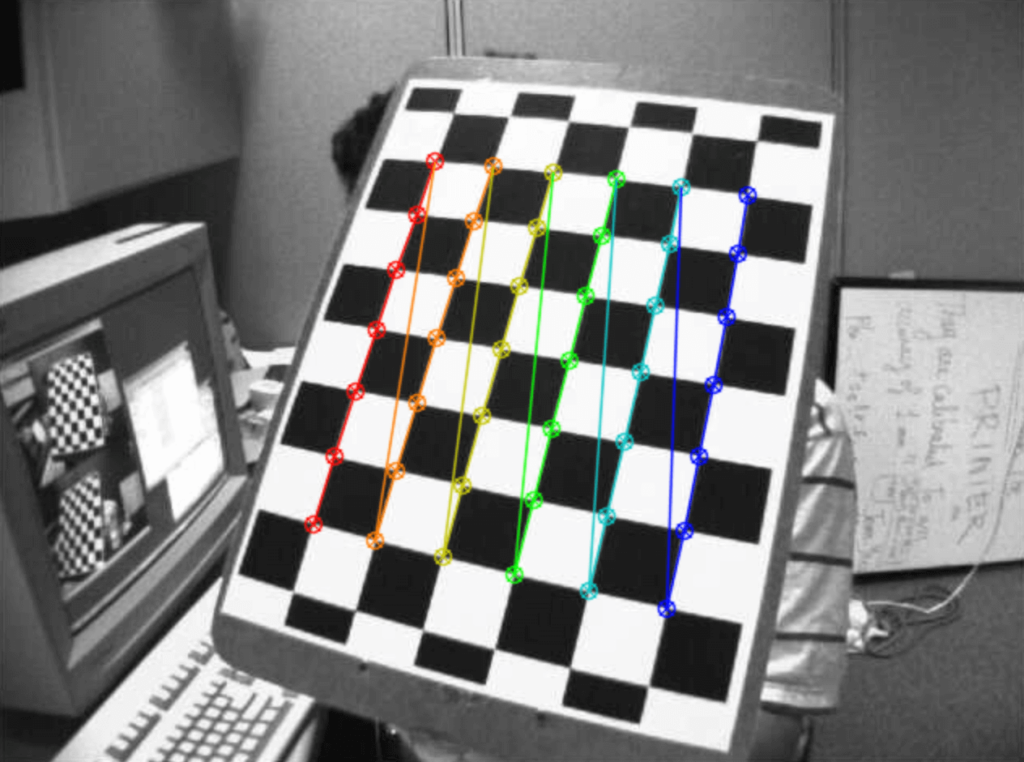
With the set of chessboard images, we can proceed to the detection of the board’s corners and the camera calibration. The following code demonstrates how to do this:
import cv2
import numpy as np
import glob

# Chessboard parameters
chessboard_size = (7, 6)  # Number of inner corners on the board (width x height)

# Prepare 3D object points
objp = np.zeros((np.prod(chessboard_size), 3), dtype=np.float32)
objp[:, :2] = np.indices(chessboard_size).T.reshape(-1, 2)

# Lists to store 3D object points and 2D image points
object_points = []
image_points = []

list_of_image_files = glob.glob('./data/chessboard/*.jpg')

# Load and process each image
for image_file in list_of_image_files:
    image = cv2.imread(image_file)
    gray = cv2.cvtColor(image, cv2.COLOR_BGR2GRAY)

    # Detect chessboard corners
    ret, corners = cv2.findChessboardCorners(gray, chessboard_size, None)

    # If corners are found, add object and image points
    if ret:
        object_points.append(objp)
        image_points.append(corners)

        # Draw and display the corners
        cv2.drawChessboardCorners(image, chessboard_size, corners, ret)
        cv2.imshow('img', image)
        cv2.waitKey(500)

cv2.destroyAllWindows()

# Calibrate the camera
ret, K, dist, rvecs, tvecs = cv2.calibrateCamera(
    object_points, image_points, gray.shape[::-1], None, None
)

print("Calibration matrix K:\n", K)
print("Distortion:", dist.ravel())
In this code, we first define the chessboard size and prepare the 3D object points. Next, we load the chessboard images and convert each image to grayscale. We detect the chessboard corners using the cv2.findChessboardCorners function and store the corresponding object and image points in the object_points and image_points lists.
If the corners are successfully found, we draw the corners on the image using the cv2.drawChessboardCorners function and display the image for a short period of time.
After processing all the images, we proceed to calibrate the camera using the cv2.calibrateCamera function, which takes the 3D object points, the 2D image points, and the grayscale image size as arguments. The function returns the calibration matrix K, the distortion coefficients, and the rotation and translation matrices for each image.
In the end, we print the calibration matrix K and the distortion coefficients.
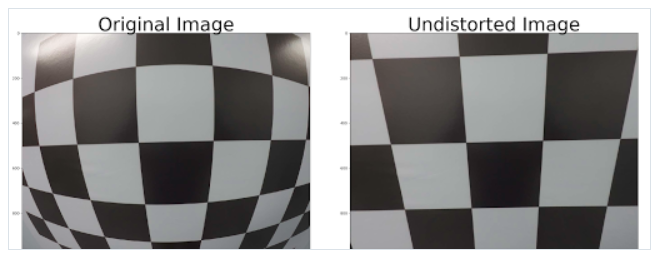
Now that we have the calibration matrix K and the distortion coefficients, we can correct the distortion in the images using the cv2.undistort function. Here’s an example of how to do it:
# Load a test image
test_image = cv2.imread('./data/test_image.jpg')

# Correct the image distortion
undistorted_image = cv2.undistort(test_image, K, dist, None, K)

# Display the original and corrected image side by side
combined_image = np.hstack((test_image, undistorted_image))
cv2.imshow('Original vs Undistorted', combined_image)
cv2.waitKey(0)
cv2.destroyAllWindows()
Conclusion
Camera calibration is a crucial aspect of computer vision, especially in applications that require high precision, such as robotic surgery and security monitoring systems. This article explored the fundamentals of lens distortion and the importance of camera calibration, as well as providing a practical implementation using Python and the OpenCV library.
By understanding the basic concepts and applying camera calibration techniques in your computer vision solutions, developers can ensure more reliable and effective results, regardless of image capture conditions.
Furthermore, computer vision is a constantly growing field, offering numerous opportunities for those wishing to enhance their skills and knowledge in this discipline. With the demand for computer vision specialists on the rise, there are plenty of opportunities abroad for qualified professionals. Seizing these opportunities can open doors to a rewarding and diverse career, allowing you to contribute to the advancement of technology and enhance your skills in a rapidly developing field.
So, don’t hesitate to dive into the world of computer vision and explore its possibilities, as the future of technology depends on bright and innovative minds like yours.