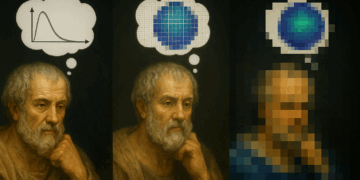
In a world full of mysteries and wonders, photography stands tall as a phenomenon that captures the ephemeral and eternal in a single moment. Like a silent dance between light and shadow, it invites our imagination to wander through the corridors of time and space. Through a surprisingly simple process, capturing rays of light through an aperture and exposure time, we are led to contemplate photographs that we know will remain everlasting.
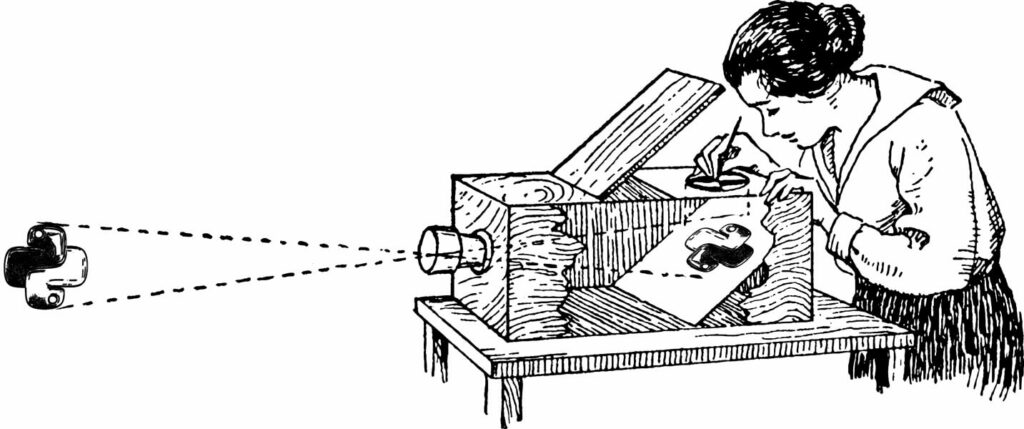
The philosopher José Ortega y Gasset once reflected on the passion for truth as the noblest and most inexorable pursuit. And undoubtedly, photography is one of the most sublime expressions of this quest for truth, capturing reality in a fragment of time.
Behind this process lies the magic of matrices, projections, coordinate transformations, and mathematical models that, like invisible threads, weave the tapestry between the reality captured by a camera lens and the bright pixels on your screen.
But to understand how it’s possible to mathematically model the visual world, with all its richness of detail, we must first understand why vision is so complex and challenging. In this first article of the series “Computer Vision: Algorithms and Applications,” I want to invite you to discover how machines see an image and how an image is formed.
The challenges in Computer Vision
Computer vision is a fascinating field that seeks to develop mathematical techniques capable of reproducing the three-dimensional perception of the world around us. Richard Szeliski, in his book “Computer Vision: Algorithms and Applications,” describes how, with apparent ease, we perceive the three-dimensional structure of the world around us and the richness of detail we can extract from a simple image. However, computer vision faces difficulties in reproducing this level of detail and accuracy.
Szeliski points out that, despite advances in computer vision techniques over the past decades, we still can’t make a computer explain an image with the same level of detail as a two-year-old child. Vision is an inverse problem, where we seek to recover unknown information from insufficient data to fully specify the solution. To solve this problem, it is necessary to resort to models based on physics and probability, or machine learning with large sets of examples.

Modeling the visual world in all its complexity is a greater challenge than, for example, modeling the vocal tract that produces spoken sounds. Computer vision seeks to describe and reconstruct properties such as shape, lighting, and color distribution from one or more images, something humans and animals do with ease, while computer vision algorithms are prone to errors.
How an Image is Formed
Before analyzing and manipulating images, it’s essential to understand the image formation process. As examples of components in the process of producing a given image, Szeliski (2022) cites:
- Perspective projection: The way three-dimensional objects are projected onto a two-dimensional image, taking into account the position and orientation of the objects relative to the camera.
- Light scattering after hitting the surface: The way light scatters after interacting with the surface of objects, influencing the appearance of colors and shadows in the image.
- Lens optics: The process by which light passes through a lens, affecting image formation due to refraction and other optical phenomena.
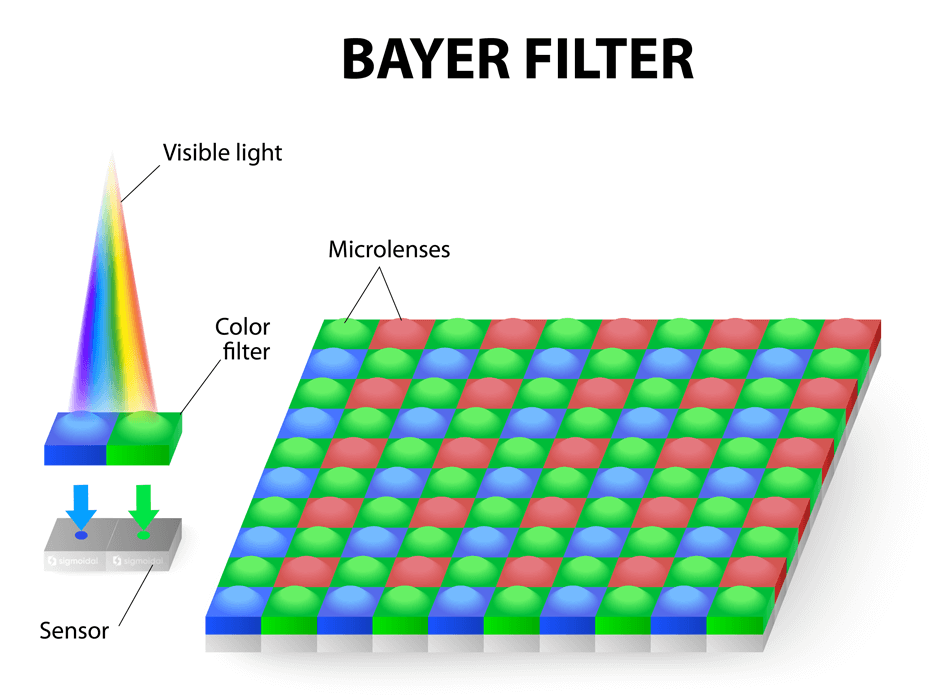
- Bayer color filter array: A color filter pattern used in most digital cameras to capture colors at each pixel, allowing for the reconstruction of the original colors of the image.
Regarding the image formation process, it’s quite simple geometrically. An object reflects the light that strikes it, and this light is captured by a sensor, forming an image after a certain exposure time. But if it were that simple, given the large number of light rays coming from so many different angles, our sensor wouldn’t be able to focus on anything and would only display a certain luminous blur.
To ensure that each part of the scene strikes only one point of the sensor, it’s possible to introduce an optical barrier with a hole that allows only a portion of the light rays to pass through, reducing blur and providing a sharper image. This hole placed in the barrier is called an aperture or pinhole, and it’s crucial for forming a sharp image, allowing cameras and other image capture devices to function properly.
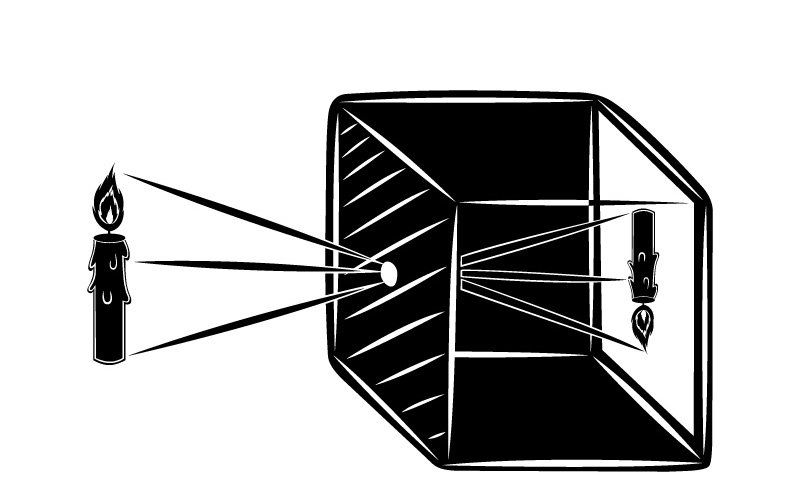
This principle of physics, known as the camera obscura, serves as the basis for the construction of any photographic camera. An ideal pinhole camera model has an infinitely small hole to obtain an infinitely sharp image.
However, the problem with pinhole cameras is that there is a trade-off between sharpness and brightness. The smaller the hole, the sharper the image. But since the amount of light passing through is smaller, it’s necessary to increase the exposure time.
Moreover, if the hole is of the same order of magnitude as the wavelength of light, we will have the effect of diffraction, which ends up distorting the image. In practice, a hole smaller than 0.3 mm will cause interference in light waves, making the image blurry.
The solution to this problem is the use of lenses. In this case, a thin converging lens will allow the ray passing through the center of the lens not to be deflected and all rays parallel to the optical axis to intersect at a single point (focal point).
The Magic of Lenses in Image Formation
Lenses are essential optical elements in image formation, as they allow more light to be captured by the sensor while still maintaining the sharpness of the image. Lenses work by refracting the light that passes through them, directing the light rays to the correct points on the sensor.
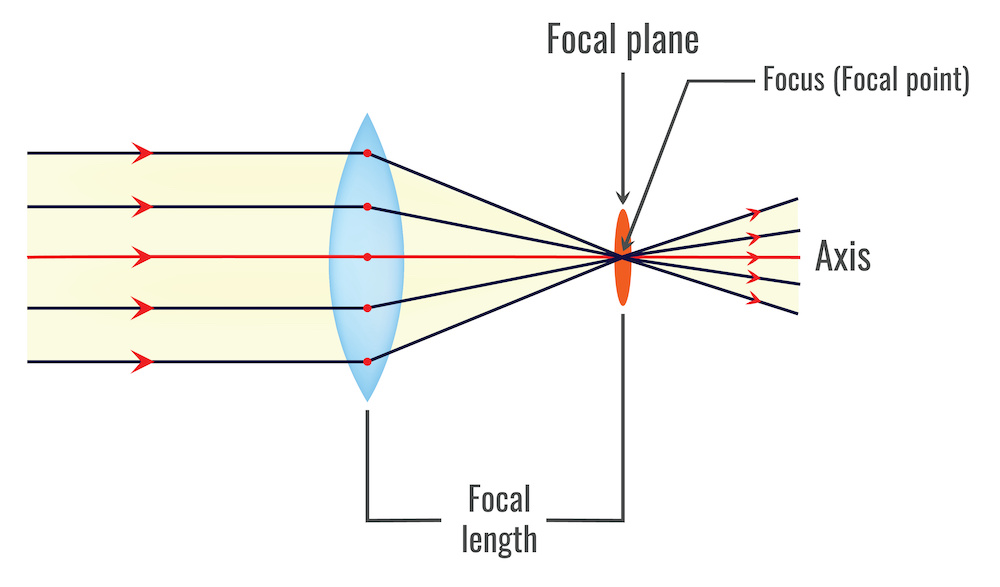
In the context of camera calibration, the thin converging lens is used as a simplified model to describe the relationship between the three-dimensional world and the two-dimensional image captured by the camera’s sensor. This theoretical model is useful for understanding the basic principles of geometric optics and simplifying the calculations involved in camera calibration, and it should satisfy two properties:
- Rays passing through the Optical Center are not deflected; and
- All rays parallel to the Optical Axis converge at the Focal Point.
As we’ll see in the next article, camera calibration involves determining the intrinsic and extrinsic parameters that describe the relationship between the real-world coordinates and the image coordinates. The intrinsic parameters include the focal length, the principal point, and lens distortion, while the extrinsic parameters describe the position and orientation of the camera relative to the world.
Although the thin lens model is a simplification of the actual optical system of a camera, it can be used as a starting point for calibration.
Focus and Focal Length
Focus is one of the main aspects of image formation with lenses. The focal length, represented by ![]() , is the distance between the center of the lens and the focal point, where light rays parallel to the optical axis converge after passing through the lens.
, is the distance between the center of the lens and the focal point, where light rays parallel to the optical axis converge after passing through the lens.
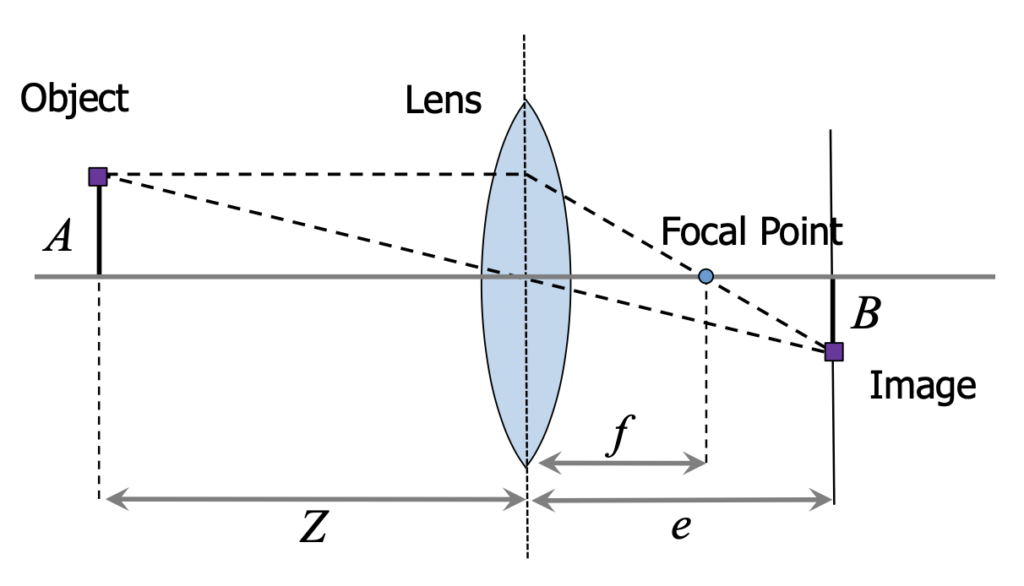
The focal length is directly related to the lens’s ability to concentrate light and, consequently, influences the sharpness of the image. The focus equation is given by:
![]()
where ![]() is the distance between the object and the lens, and
is the distance between the object and the lens, and ![]() is the distance between the formed image and the lens. This equation describes the relationship between the focal length, the object distance, and the formed image distance.
is the distance between the formed image and the lens. This equation describes the relationship between the focal length, the object distance, and the formed image distance.
Aperture and Depth of Field
Aperture is another essential aspect of image formation with lenses. The aperture, usually represented by an ![]() -number value, controls the amount of light that passes through the lens. A smaller
-number value, controls the amount of light that passes through the lens. A smaller ![]() -number value indicates a larger aperture, allowing more light in and resulting in brighter images.
-number value indicates a larger aperture, allowing more light in and resulting in brighter images.
Aperture also affects the depth of field, which is the range of distance at which objects appear sharp in the image. A larger aperture (smaller ![]() -number value) results in a shallower depth of field, making only objects close to the focal plane appear sharp, while objects farther away or closer become blurred.
-number value) results in a shallower depth of field, making only objects close to the focal plane appear sharp, while objects farther away or closer become blurred.
This characteristic can be useful for creating artistic effects, such as highlighting a foreground object and blurring the background.
Focal Length and Angle of View
The lens’s focal length also affects the angle of view, which is the extent of the scene captured by the camera. Lenses with a shorter focal length have a wider angle of view, while lenses with a longer focal length have a narrower angle of view. Wide-angle lenses, for example, have short focal lengths and are capable of capturing a broad view of the scene. Telephoto lenses, on the other hand, have long focal lengths and are suitable for capturing distant objects with greater detail.
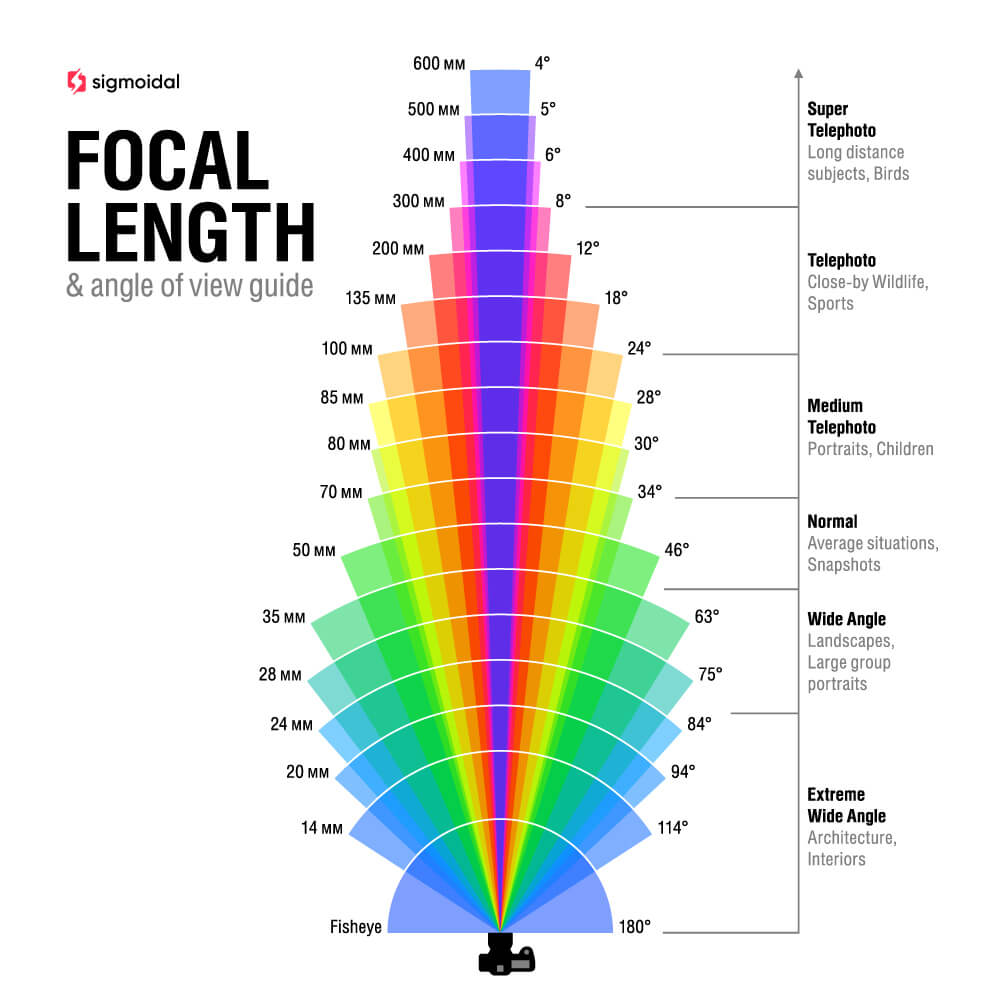
By selecting the appropriate lens, it is possible to adjust the composition and framing of the image, as well as control the amount of light entering the sensor and the depth of field. Furthermore, the use of lenses allows for manipulation of perspective and capturing subtle details that would be impossible to record with a pinhole model.
In summary, the lens is a crucial component in image formation, allowing photographers and filmmakers to control and shape light effectively and creatively. With proper knowledge about lens characteristics and their implications in image formation, it is possible to explore the full potential of cameras and other image capturing devices, creating truly stunning and expressive images.
Capture and Representation of Digital Images
Digital cameras use an array of photodiodes (CCD or CMOS) to convert photons (light energy) into electrons, differing from analog cameras that use photographic film to record images. This technology allows capturing and storing images in digital format, simplifying the processing and sharing of photos.
Digital images are organized as a matrix of pixels, where each pixel represents the light intensity at a specific point in the image. A common example of a digital image is an 8-bit image, in which each pixel has an intensity value ranging from 0 to 255. This range of values is a result of using 8 bits to represent intensity, which allows a total of 2^8 = 256 distinct values for each pixel.
Digital images are organized as a matrix of pixels, where each pixel represents the light intensity at a specific point in the image. A common example of a digital image is an 8-bit image, in which each pixel has an intensity value ranging from 0 to 255. This range of values is a result of using 8 bits to represent intensity, which allows a total of ![]() distinct values for each pixel.
distinct values for each pixel.
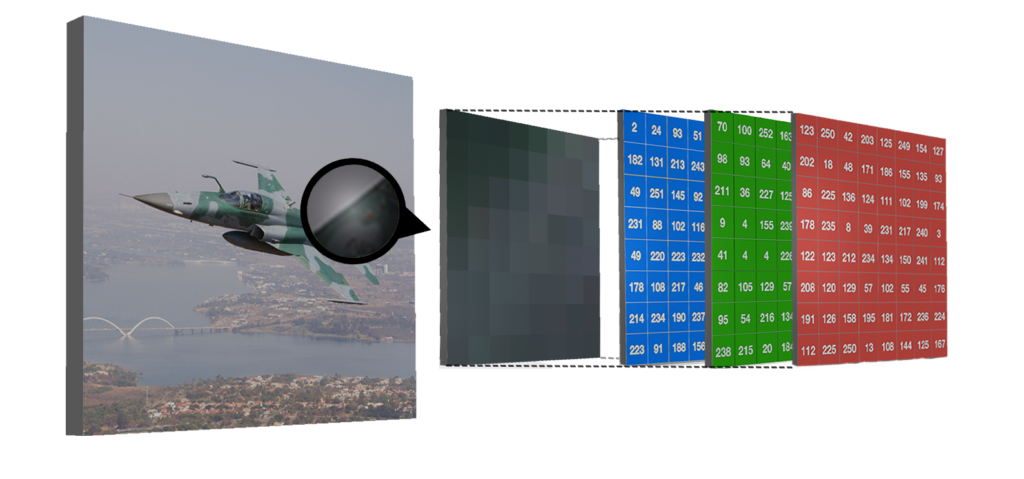
In the figure above, we see an example of how a machine would “see” a Brazilian Air Force aircraft. In this case, each pixel has a vector of values associated with each of the RGB channels.
Digital cameras typically adopt an RGB color detection system, where each color is represented by a specific channel (red, green, and blue). One of the most common methods for capturing these colors is the Bayer pattern, developed by Bryce Bayer in 1976 while working at Kodak. The Bayer pattern consists of an alternating array of RGB filters placed over the pixel array.
It is interesting to note that the number of green filters is twice that of red and blue filters, as the luminance signal is mainly determined by the green values, and the human visual system is much more sensitive to spatial differences in luminance than chrominance. For each pixel, missing color components can be estimated from neighboring values through interpolation – a process known as demosaicing.
However, it is important to emphasize that this is just a common example. In practice, a digital image can have more bits and more channels. Besides the RGB color space, there are several other color spaces, such as YUV, which can also be used in the representation and processing of digital images.
For example, during the period I worked at the Space Operations Center, I received monochromatic images with radiometric resolution of 10 bits per pixel and hyperspectral images with hundreds of channels for analysis.
Summary
This article presented the fundamentals of image formation, exploring the challenges of computer vision, the optical process of capture, the relevance of lenses, and the representation of digital images.
In the second article of this series, I will teach you how to implement a practical example in Python to convert the coordinates of a real 3D object to a 2D image, and how to perform camera calibration (one of the most important areas in Computer Vision).
References
- Szeliski, R. (2020). Computer Vision: Algorithms and Applications. Springer.
- Gonzalez, R. C., & Woods, R. E. (2018). Digital Image Processing. Pearson Education.

